Thanksgiving has come and gone and now it’s all about peppermint, eggnog and plates of cookies left under the tree for Santa. It’s officially Christmas time! While we certainly still suggest loosely following your nutrition plan, we also think there’s a way to incorporate your favorite holiday treats into the season without overdoing it. If you have a sweet tooth, then this is the post for you.
Here are four simple ways you can add a little sweetness to your holiday diet without overdoing it:
- Portion out your treats.
If you’ve been working out at Tally Ho for a while, then you know the importance of portion control. This same principle applies to dessert. If you want to indulge in your favorite holiday sweet, then stick to one portion. Even better, plan out your sweet indulgence by writing it down in your nutrition journal or logging it in your smartphone (we love MyFitnessPal!) If you can work the treat into your daily calorie goal, then it won’t harm your fitness goals.
- Only indulge in “the good stuff.”
If you’re going to have something sweet, make it good. Halloween is the time for fun-size candy and generic brands. Christmas is the time for that oh-so-delicious slice of cake or pie that only comes around once a year. Instead of taking handfuls from the porcelain candy tray at grandma’s, cut a beautiful slice of that decadent chocolate cream pie you think about all year long. Place it on a beautiful piece of china and, of course, get that good lighting so you can take a photo and post that bad boy on Instagram.
- Shave off the extra calories.
There are sneaky ways to shave off calories from your favorite desserts. Instead of adding a scoop of ice cream to the pie, have it plain. Skip the piles of whipped cream and have your dessert by itself. By minimizing “the excess,” you can set yourself up for success by saving a few extra calories. Plus, if the dessert is THAT delicious, does it really need all the bells and whistles?
- Share!
This is the season of giving, after all. If you’re baking a smorgasbord of delicious desserts and end up with extras, share the wealth! Get crafty and package up your extra baked goods and give them out to coworkers or friends. (We love these watercolor gift tags from Etsy—perfect for adding a little holiday cheer to a bag of cookies or caramel popcorn!) Make the season about spreading cheer instead of sitting on the couch with a half-eaten pie (because, well, that just sounds sad).
BONUS: Healthy holiday dessert recipes!
Collagen Peanut Butter Cups (developed by Onnit)
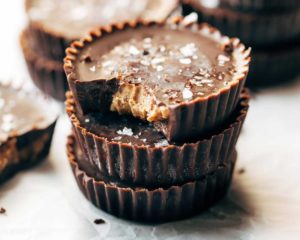
(yields 12 cups)
Ingredients:
- ½ cup Lily’s Stevia-sweetened mini dark chocolate chips*
- 2 tbsp. coconut oil
- Pinch of Himalayan salt
- ⅓ cup Onnit Creamy Peanut Butter Fatbutter
- 1 tbsp. unsweetened vanilla almond milk
- 2 tsp. raw honey
- ⅛ tsp. vanilla extract
- 1 scoop of collagen protein powder**
Directions:
- Line a mini muffin pan with 12 mini baking [muffin] cups.
- In a double-boiler, add the chocolate chips and coconut oil. Heat on medium-low and continue stirring until the chocolate is fully melted and the mixture is smooth. You can also do this in 30-second increments in the microwave.
- Spoon about ½ tbsp. of the melted chocolate mixture into each baking cup or just enough to cover the bottom with a thin layer. After you have filled the cups, carefully tip the pan so the chocolate spreads halfway up the sides of each cup. Place the pan in the freezer for 10 minutes or until the chocolate hardens.
- In a separate mixing bowl, add the Peanut Butter Fatbutter, Sweet Leaf Stevia Drops, raw honey, collagen powder, and 1 tbsp. of almond milk. Stir until smooth.
- Remove the muffin pan from the freezer. Add a 2-tsp size dollop of the protein peanut butter mixture in each muffin cup. Spread along the bottom, leaving a little room along the edges.
- Pour another ½ tbsp. of melted chocolate in each cup, fully covering the peanut butter mixture. Sprinkle Himalayan salt on top. Freeze for about 1minutes, or until the chocolate shell fully hardens.
- Makes 12 small peanut butter cups. Store in the freezer until ready to eat. Forewarning: the chocolate melts easily and can get a little messy. Worst-case scenario, you lick chocolate off your fingers…
NOTES:* I used Lily’s Stevia-sweetened dark chocolate baking chocolate chips in this recipe. Unsweetened dark chocolate chips can be substituted, but that’ll add sugar. **I recommend using vanilla or unflavored protein powder; preferably an all-natural variety with little to no artificial flavoring or dyes. We like Primal Kitchen’s coconut-vanilla collagen protein and Vital Protein’s unflavored collagen peptides.
Chocolate Chip Protein Cookie Sandwiches (Developed by MacroChef)
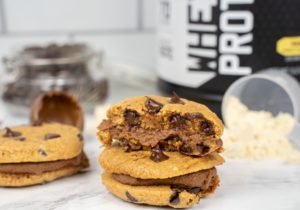
(Yields 10 cookies / 5 sandwiches)
Ingredients For the Chocolate Chip Cookies
2 1/2 Scoops (97g) Vanilla whey protein
1 cup (112g) peanut flour
8 tbsp. (56g) coconut flour
1/4 cup (50g) Swerve granular sweetener*
1/2 tsp baking soda
Pinch salt
3/4 cup (180mL) unsweetened almond milk
1 whole egg
1/4 cup chocolate chips
Ingredients For the Chocolate Filling
1/4 cup plain, nonfat Greek yogurt
1 scoops Chocolate whey
1 tbsp. cocoa powder
2 tbsp. Swerve confectioners (more or less to taste, the protein adds a good amount of sweetness)*
1 tbsp. melted chocolate chips (optional but delicious)
Instructions:
- Preheat the oven to 350F.
- Add all dry ingredients for the cookies to a large bowl: vanilla protein, peanut flour, coconut flour, sweetener, baking soda, and salt. Mix.
- Now add almond milk and egg. Stir together the mixture until a thick cookie dough forms.
- If it is too dry and crumbly, add a little milk. If it is too thin, add a little peanut flour or coconut flour. Once the dough is formed, add chocolate chips and fold into dough.
- Scoop dough onto a baking sheet lined with parchment to make 10 cookies. Each should be about 3 tbsp of dough. Press down slightly to flatten the cookie.
- Bake at 350F for 10 minutes. They will seem undercooked, but that is ok. They will continue to cook and firm up once out of the oven. If overbaked, they will become dry and crumbly.
- Let cookies completely cool while making the chocolate filling. Add all ingredients to a bowl. Whisk together until a thick, smooth chocolate frosting forms.
- Scoop a few tbsp of the chocolate filling onto 5 of the cookies, then top with the other remaining cookies to make cookie sandwiches. Enjoy!